For a long time now, I've loved the look of Christian Louboutin's classic black pumps with red bright red soles. It's such a beautiful and classic style but I definitely cannot afford a $625 pair of shoes!
I was browsing on Pinterest a few weeks ago and I saw this girl's DIY shoe makeover using nail polish. I re-pinned it because I thought, "oh that's cool, but I don't have any shoes that I want to make neon..."
Then, it hit me! I had just bought a pair of BCBG black pumps at "Savers" (a store that's similar to Salvation Army but a little nicer) for $8... I could turn those into really expensive looking red-soled shoes for pretty cheap, and if they turned out like crap, it wasn't like I spent a lot of money.
So here is how I turned my regular black pumps into Christian Louboutin knock-offs!
These are the BCBG black pumps that I started with:
In the post that I got my inspiration from she suggested using sand paper to rough up the spots that you are going to paint. Well, I didn't have sandpaper but I had something just as good: a nail file!
I used the nail file to rough up the sole and heel of the shoe where I planned to paint.
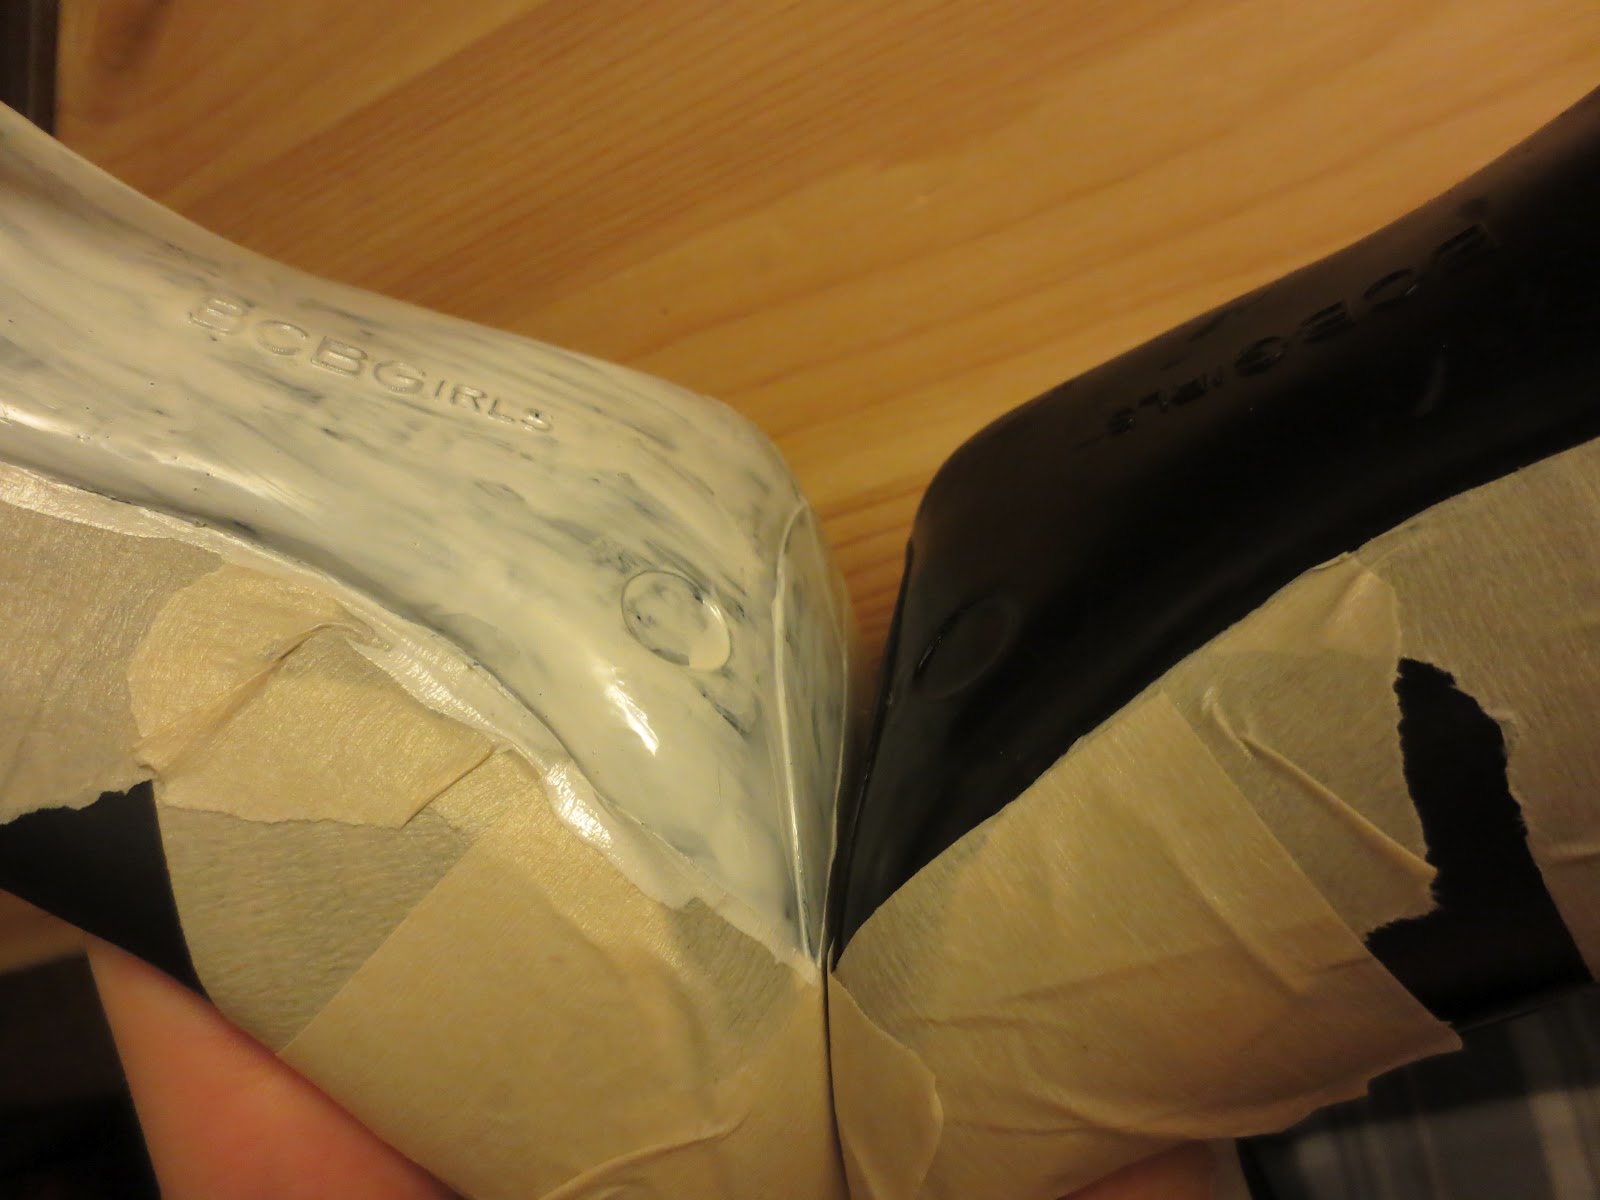
Then I used masking tape to tape off all of the edges of the shoe, including the heel.
*Note: I realized after that I should have used painters tape! DO NOT USE MASKING TAPE!
You want to make sure that you tape it really well (use your fingernail to press it into the corners) because if there are gaps, the polish will go where you don't want it to go! Also, I didn't want to waste nail polish on front of the sole where the ball of the foot is because it will just get scuffed up anyway. I taped it off just past where it hits the ground so you can't tell its not all red.
Be especially particular taping around the places where its curved, like the heel, and use lots of small pieces to make sure the corner is rounded.
Then, once the soles were roughed up and taped, I used my white nail polish as primer and let it dry (mine only took about 10 minutes). You can choose to let it dry overnight if you want to, but I was just too excited to wait!
You may think that it is difficult to make sure that the tape is in the same spot on both shoes, but all you need to do is touch the shoes together (sole to sole), use a pen to make a couple tiny marks, and put the tape on in the same places.
Time for the RED!! I used the only paintbrush I had in the house, which was a cheap foam one. I found that it was much better to use a paintbrush then the nail polish brush because it dries very fast and you need to cover a larger area in a short amount of time.
I also found that it was easier to just pour some polish right on the sole and then spread it quickly with the brush. Don't be too concerned with the first coat looking perfect because it will just be covered up by more paint.
This is what happens when you use the nail polish brush and don't spread it quickly! oops! It ended up being fine because I did a few more coats on top of it.
The only thing I would do differently (other than NOT using masking tape!) is I would do another coat of white "primer" and then make sure to get the edges really well during the first and second coats of red, because that is the part people will see first when you're wearing them.
I let my shoes dry overnight after then third coat of polish. The next morning I decided I should probably go and get a better paintbrush so I went out and got this white one for $2.99.
All-in-all I think I put about 5-6 coats of the red nail polish... I know, it sounds like a lot, but I really wanted the red to be bold and perfect.
Even after that many coats of polish, I still have some left for my toes!
I let the last coat dry for several hours while I made me and Mr. Modern some dinner and typed most of this blog post. Then I added the coat of clear nail polish:
You should let it dry as long as you can stand to wait (preferably overnight), just so that when you go to remove your tape it doesn't peel away all of your hard work!
I ended up needing a mini razor blade to make sure I wasn't going to ruin the edges. I also found that it came in handy to trim off the excess paint on the edges, especially around the heel.
As it turns out, the masking tape was a BAD idea... so if you decide to do this, use painters tape!!
Now, it's hard to tell if the white on the edges is just masking tape or if it's from the primer... either way, it had to be fixed! So I made a second trip to the craft store and bought black acrylic paint and a tiny angled brush so I could clean up the edges.
Once the black dried, I used the same brush to add some extra clear polish to all the edges to prevent chipping.
Here is the before and after with the addition of the black paint:
Here is the final product!!!
I cannot tell you how fabulous I feel wearing these shoes! Plus, it is even more fabulous knowing that I spent WAY less than $625.00!!!
Here is the cost breakdown:
Shoes (used) - $8.00
Tape - free (I had it already)
Nail file - free (I had one already)
Wide paint brush - $2.99
Small angled paint brush - $2.99
Sally Hansen Xtreme wear nail polish in "White On" - $2.49
Essie nail polish in "Forever Yummy" - $7.79
Black acrylic paint - $2.99 (originally $4.99 but I had a 40% off coupon!)
OPI Top Coat - $6.68
Total Cost: $33.93!!
It actually cost me even less ($19.46 total) because I also already had the Essie and OPI polishes!
Leave me a comment and tell me what you think! If you liked it, please share my blog with your friends, and if you try it yourself I would love to see pictures!! :)
Dancing in my Forever Yummy shoes,